# 필수는 아니나 Dockerfile 를 제작할 때에는 디렉토리 생성 후 해당 디렉토리에 접근해 사용할 것을 권장
1. HTTP 서비스 구축
1.1. 디렉토리 만들기 : mkdir /http
1.2. 디렉토리 들어가기 : cd /http
1.3. Dockerfile 만들기 : vi Dockerfile
| # step1 : base image FROM rockylinux:9 # step2 : httpd install RUN dnf install -y httpd RUN dnf install -y net-tools RUN sed -i 's/Listen 80/Listen 8080/' /etc/http/conf/httpd.conf RUN systemctl enable httpd # step3 : index.html file copy COPY index.html /var/www/html/ # step4 : web execute CMD /usr/sbin/httpd -D FOREGROUND # step5 : port EXPOSE 8080 |
1.4. index.html 만들기 : vi index.html
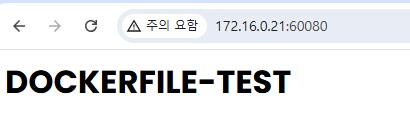
| <html> <body> <h1>DOCKERFILE-TEST</h1> </body> </html> |
1.5. 빌드 : docker bulid -t httpd:behwang .
1.6. 컨테이너 실행 : docker run -itd -p 60080:80 --name h1 httpd:behwang
2. FTP 서비스 구축
2.1. 디렉토리 만들기 : mkdir /ftp
2.2. 디렉토리 들어가기 : cd /ftp
2.3. Dockerfile 만들기 : vi Dockerfile
| #Dockerfile FROM rockylinux:9 RUN dnf install -y vsftpd RUN setenforce 0 COPY user.sh /ftp/user.sh COPY ftp.txt /ftp/ftp.txt COPY vsftpd.conf /etc/vsftpd/vsftpd.conf COPY chroot_list /etc/vsftpd/chroot_list RUN sh /ftp/user.sh EXPOSE 21 50000-50010 CMD ["/usr/sbin/vsftpd","-obackground=NO"] |
2.4. user.sh 만들기 : vi user.sh
| useradd a echo 'It1' | passwd --stdin a useradd b echo 'It1' | passwd --stdin b |
2.5. ftp.txt 만들기 : vi ftp.txt
| +++++++++++++++++++++ Docker! Vsftpd! +++++++++++++++++++++ |
2.6. vsftpd.conf 만들기 : vi vsftpd.conf
| #vsftpd.conf anonymous_enable=NO local_enable=YES write_enable=YES local_umask=022 dirmessage_enable=YES xferlog_enable=YES xferlog_file=/var/log/xferlog xferlog_std_format=YES chroot_list_enable=YES chroot_list_file=/etc/vsftpd/chroot_list banner_file=/test/ftp.txt listen=YES pam_service_name=vsftpd userlist_enable=YES tcp_wrappers=YES pasv_enable=YES pasv_min_port=50000 pasv_max_port=50010 allow_writeable_chroot=YES |
2.7. chroot_list 만들기 : vi chroot_list
| a |
2.8. 빌드 : vi Dockerfile
2.9. 컨테이너 실행 : docker run -d -p 21:21 -p 50000-50010:50000-50010 --name f1 vsftpd:behwang
2.10. 방화벽 설정
step1) firewall-cmd --permanent --add-port=21/tcp
step2) firewall-cmd --permanent --add-port=50000-50010/tcp
step3) 저장 : firewall-cmd --reload
3. DNS 구축
3.1. 디렉토리 만들기 : mkdir /bind
3.2. 디렉토리 들어가기 : cd /bind
3.3. Dockerfile 만들기 : vi Dockerfile
| # DNS Build # Step 1 : Base Image Install FROM rockylinux:9 # Step 2 : Bind Package Install RUN dnf install -y bind bind-utils bind-libs RUN dnf install -y net-tools RUN sed -i 's/127.0.0.1/any/g' /etc/named.conf RUN sed -i 's/localhost/any/g' /etc/named.conf RUN systemctl enable named # Step 3 : Configuration File Settiong COPY named.rfc1912.zones /etc/named.rfc1912.zones COPY behwang.com /var/named/ COPY resolv.conf /etc/resolv.conf RUN chmod 755 /var/named/behwang.com # Step 4 : named execute CMD ["/usr/sbin/named", "-c", "/etc/named.conf", "-g", "-u", "named"] # Step 5 : Port EXPOSE 53/udp EXPOSE 53/tcp |
3.4. named.rfc1912.zones 만들기 : vi named.rfc1912.zones
| zone "localhost.localdomain" IN { type master; file "named.localhost"; allow-update { none; }; }; zone "localhost" IN { type master; file "named.localhost"; allow-update { none; }; }; zone "1.0.0.0.0.0.0.0.0.0.0.0.0.0.0.0.0.0.0.0.0.0.0.0.0.0.0.0.0.0.0.0.ip6.arpa" IN { type master; file "named.loopback"; allow-update { none; }; }; zone "1.0.0.127.in-addr.arpa" IN { type master; file "named.loopback"; allow-update { none; }; }; zone "0.in-addr.arpa" IN { type master; file "named.empty"; allow-update { none; }; }; zone "behwang.com" IN { type master; file "behwang.com"; allow-update { none; }; }; |
3.5. behwang.com 만들기 : vi behwang.com
| $TTL 1D @ IN SOA ns1.behwang.com. root. ( 0 ; serial 1D ; refresh 1H ; retry 1W ; expire 3H ) ; minimum NS ns1.behwang.com. MX 10 mail.behwang.com. A 192.168.0.1 www A 192.168.0.1 ftp A 192.168.0.2 mail A 192.168.0.4 ns1 A 192.168.0.3 |
3.6. resolv.conf 만들기 : vi resolv.conf
| nameserver 192.168.0.3 nameserver 8.8.8.8 |
3.7. 빌드 : docker build -t dns1.0 .
3.8. 컨테이너 구동 : docker run -itd --name d1 dns1.0
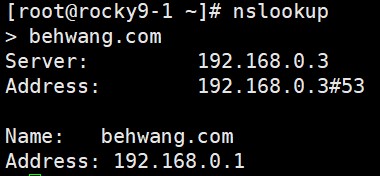
3.9. 확인
'docker' 카테고리의 다른 글
| docker : MYSQL ↔ WORDPRESS 연동 (로컬 호스트) (0) | 2024.12.12 |
|---|---|
| docker : 웹 서비스 및 로드밸런서 구축 (0) | 2024.12.12 |
| docker : 설치 및 활용 (0) | 2024.12.11 |